

How To Fix A Printer That Prints Lines
Z7_3054ICK0KGTE30AQO5O3KA30N0
hp-concentra-wrapper-portlet
![]() Actions
Actions
HP Deskjet 6830 and 6840 - Streaks or Lines in the Printed Image
Problem
The printer is working, but printed output shows streaks or lines. The lines are perpendicular to the direction the paper moved through the printer (and parallel to the movement of the cartridges during printing). Test patterns on the diagnostic page may show missing lines, streaks, or faded patterns.
Figure : Defect, with the direction the paper moved through the printer indicated

Step 1 - Check the ink levels
note:If a refilled or remanufactured print cartridge, or a cartridge that has been used in another product, is installed the ink level indicator is inaccurate or unavailable.
-
Make sure that the product is turned on and connected to the computer.
-
Click Start and click Control Panel.
-
Double-click the Printer and Faxes folder.
-
Right-click the icon for the product and click Preferences.
-
Click the Services tab, and then click Service this Device.
-
The printer Toolbox opens. Click the Estimated Ink Level tab.
A graphic showing the estimated ink levels appears. The graphic shows both the color and black ink cartridge with the ink level indicated by the fill inside the cartridge diagram.
Figure : Estimated ink levels - both cartridges low

Step 2 - Check the printer settings
-
In the program being used for printing, click File, and then click Print.
The Print window opens.
-
Make sure the appropriate product is selected, and then click Preferences or Properties.
The Preferences/Properties window opens.
-
Click the Printing Shortcuts tab.
Consider modifying some or all of the options in the Printing Shortcuts menu to increase print quality.
-
Print quality: If the quality of the printouts is not acceptable, try increasing the print quality. To print more quickly, try decreasing the print quality.
-
Paper type: If one of the options matches the paper type exactly, select it instead of Automatic.
-
Paper size: Make sure that this option matches the paper loaded in the product.
To see additional options, click the Advanced tab, and then click Advanced Features.
The Advanced Features window opens. Consider changing the following option:
Ink volume: Adjust the amount of ink that prints on a page. For lighter images (less ink), drag the slider to the left. For darker images (more ink), drag the slider to the right. The lighter the ink volume, the more quickly the printout dries.
-
Step 3 - Run the clean print cartridges utility
-
Make sure the printer is on and connected to the computer.
-
Click the Windows Start button, then click Control Panel.
-
Double-click the Printer and Faxes folder.
-
Right-click the icon for your printer and choose Preferences.
-
Choose the Services tab and click Service this Device.
-
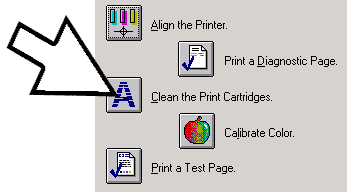
The Printer Toolbox opens. On the Device Services tab, click Clean the Print Cartridges, then follow the onscreen instructions. Up to three levels of cleaning are available. Discard or recycle the page that prints.
Figure : Click Clean the Print Cartridges
Step 4 - Print a diagnostic page
If the steps above have not helped, you may have to replace a cartridge. Print and evaluate a diagnostic page to determine which cartridge to replace.
-
Make sure the printer is on and loaded with unused, plain, white paper.
-
Press and hold the Power button, then click the Cancel button once. Then release both buttons. The diagnostic page prints.
-
Press and hold the Power button
-
Press the Cancel button once
Figure : The Power and Cancel buttons

-
Step 5: Note which cartridges printed which areas of the diagnostic page
Identify which cartridge printed which part of the diagnostic page, so that if you find defects on the page, you know which cartridge is the problem.
However, you can install different combinations of ink cartridges in your printer, and different cartridge combinations print different diagnostic page patterns. The diagnostic page might not look exactly like the example presented here, but the right and left cartridges print in the same areas of the page no matter which cartridges are installed.
Figure : Diagnostic page layout (the patterns in each area might look slightly different on your page) Printed by the right cartridge Printed by the left cartridge

note:If you are printing in reserve mode (one cartridge is missing), the area of the diagnostic page where that cartridge prints is blank.
Step 6: Look for defects
In general, if the printer and print cartridges are working properly, the patterns (which look like grids of lines) should contain few or no missing lines. Also, the colors of the patterns and bars should be approximately the same as the color dots on the print cartridge label.
note:Do not compare the colors on your diagnostic page to the colors on this Web page. Unless your monitor is calibrated, the colors will not be correct. Instead, compare the colors on the page to the colors dots on the print cartridge label. While the color dots may not be perfectly accurate, they are likely to be more accurate than the colors on the monitor.
Missing lines or streaked bars
If a pattern shows more than a few missing lines, or a bar is streaked, that print cartridge is not functioning properly.
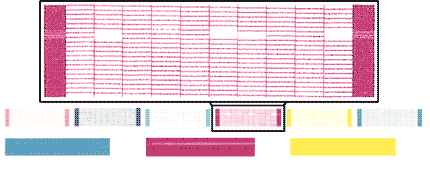
Figure : The right cartridge (a photo cartridge) shows missing lines and a streaked bar - the cartridge is not functioning properly
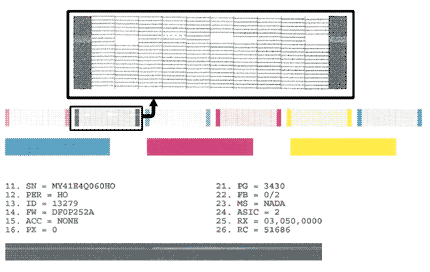
Figure : The left cartridge (a tri-color cartridge) shows missing lines and a streaked bar - the cartridge is not functioning properly
Color mix
If the color of the patterns or bars is very different from the color dots on the cartridge label, the cartridge is not functioning properly.
Figure : Color dots on the left (tri-color) cartridge label

Figure : The color of one of the left cartridge bars is very different from the color on the cartridge label - the cartridge is not functioning properly

Missing colors
If any of the color blocks or patterns is entirely missing, the cartridge is not functioning properly.
Figure : The yellow pattern and bar for the left (tri-color) cartridge is missing

Ink smears
If the diagnostic page shows smeared ink, you may need to clean your cartridges.
Figure : Left (black) cartridge shows smeared ink

Step 7: If you saw no defects
How To Fix A Printer That Prints Lines
Source: https://support.hp.com/us-en/document/c00243030
Posted by: reidwhentersed73.blogspot.com
0 Response to "How To Fix A Printer That Prints Lines"
Post a Comment